By Calli | Licensed Chiropractor & Esthetician | March 27, 2026
Almost every gua sha tutorial I’ve ever seen online starts at the face. And almost every gua sha tutorial I’ve ever seen online is, in my opinion, starting in the wrong place.
I promised in my last post that the full face guide was coming — and here it is. But before we touch the jawline, the cheekbones, or anything on the face, I want to explain why I always begin at the scalp, move through the neck, open the lymphatic pathways at the collarbone, and only then work my way up to the face. The sequence is not arbitrary. It’s anatomy.
As both a chiropractor and a licensed esthetician, I look at the scalp, neck, and face as a single interconnected unit of fascia, muscle, and lymphatic tissue. Tension in one area affects all the others. Drainage in one area depends on the ones below it being open first. This is the approach I use in practice — and the one I follow myself at home, 2–3 times a week, after my shower.
“If you want to lift the face, the scalp is where you actually start. Everything flows from the top down — and drains from the bottom up.”
This is not a 10-step spa ritual. It’s a simple, intentional sequence you can work through in 5–10 minutes. The goal is circulation, lymphatic flow, and muscle release — not dramatic scraping. Light touch, correct direction, right tool for the right area. That’s all it takes.
IN THIS GUIDE
1. The Two Tools I Use — And Why Each One Has a Job
I use two different gua sha tools in my routine — not because more tools means better results, but because the scalp and the face genuinely call for different materials and shapes. Using the same tool for both tends to mean you’re compromising somewhere.
For the Scalp: Wood
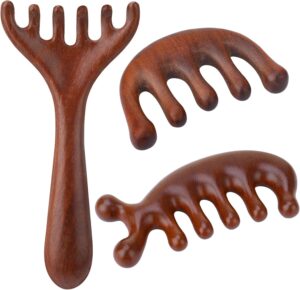
👉 Wooden Scalp Gua Sha Comb Set
For scalp work, I reach for a wooden tool. Wood has just enough natural texture to grip gently through hair without snagging, and the lighter weight makes it easy to use for a few minutes without fatigue in your hand. It’s ideal for the kind of broad, sweeping strokes the scalp benefits from — moving through the hair the way a wide-toothed comb would, but with intention.
The one thing to know about wood: it’s more delicate than stone or ceramic. It doesn’t respond well to heavy pressure or being dropped, so treat it accordingly. Light, consistent strokes are both the correct technique and the best way to keep the tool in good shape.
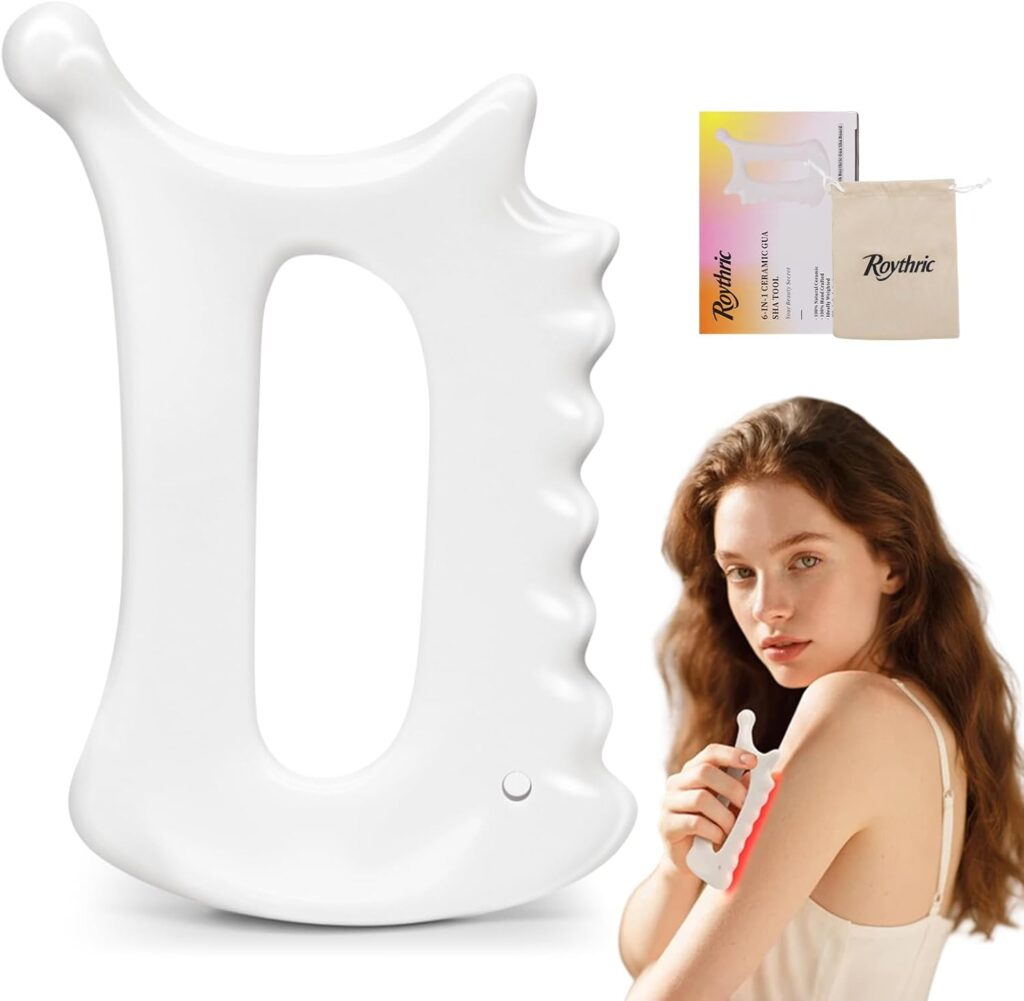
For the Neck, Collarbone & Face: Ceramic
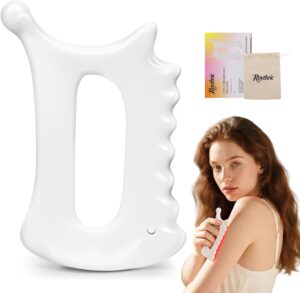
👉 Ceramic Facial Gua Sha — Lymphatic Drainage
For everything below the hairline, I switch to a ceramic tool. Ceramic glides predictably over skin, gives you better control around the curves of the jaw and neck, and the weight provides just enough passive resistance without requiring you to press down. I look for a shape with a concave or notched edge for the jawline and SCM, and a flatter, broader edge for the collarbone and cheek areas.
The pointed tip or rounded corner on a ceramic tool is also useful — more on that when we get to the eye and brow area.
Calli’s Tip
Clean both tools after every use — a quick rinse with mild soap and warm water, then air dry. Keeping them clean is basic hygiene, but it also helps you stay consistent with the routine. If the tools feel like a chore to maintain, you’ll use them less. Make it easy.
2. Before You Start: Prep That Actually Matters
The best time for this routine is right after a shower. The warmth has already softened the skin and started to relax the superficial fascia — which means your tools can do more with less pressure, and the lymphatic system is a little more responsive. This is the window I use personally, and the one I tend to recommend.
What to Apply Before You Begin
- After your shower, apply your toner or facial water while the skin is still slightly warm
- Follow with a lightweight cream or facial oil — just enough to give the ceramic tool slip without leaving the skin too slippery to work with
- You do not need to reapply product constantly throughout the routine. One application before you start is generally enough
- Never use the ceramic tool on completely dry skin — friction without slip can irritate the surface and works against what you’re trying to do
Calli’s Tip
For the scalp, no product is needed — the wooden comb works directly through dry or damp hair. This also makes the scalp portion the easiest part to do consistently, even on evenings when you don’t feel like a full routine. Two to three minutes on the scalp alone is worth doing.
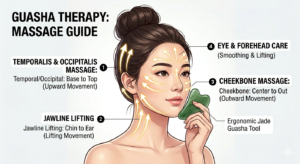
3. Step 1 — Scalp & Temporalis: The Foundation of Face Lifting
This is the step most people skip entirely — and in my opinion, it’s the one that makes the biggest difference over time.
The temporalis is a broad, fan-shaped muscle that sits along the side of your skull, running from the temple down toward the upper jaw. Most adults carry a significant amount of tension here — especially those who clench their jaw, spend hours at a screen, or tend to hold stress in the head and neck. When the temporalis is chronically tight, it pulls on the fascia of the scalp, which in turn influences the tension patterns of the face below it. Releasing this muscle is, in my experience, one of the most direct ways to create a sense of softening and lifting in the face — not through scraping the face itself, but by addressing the structure above it.
Think of it like this: the scalp is the anchor point. If the anchor is tight, everything hanging below it — the brow, the mid-face, the jawline — carries that tension. Releasing the scalp first gives the face somewhere to go.
How to Do It
- Pick up your wooden gua sha comb
- Begin just behind the ear — place the comb at the base of the skull (occipital ridge) and sweep upward and forward toward the crown, following the natural direction of the hair
- Work across the entire side of the scalp, moving from back to front — occipital area, then temporal area, then toward the frontal hairline
- The stroke is slow and intentional — imagine you’re combing with purpose, not rushing. The comb should glide through the hair rather than catch on it
- Pressure: light to medium. You should feel a pleasant scalp sensation — not discomfort. If it feels like you’re digging in, ease off
- Repeat on both sides — 3 to 5 passes per zone is enough
- Finish by sweeping from the crown downward toward the nape of the neck, encouraging fluid movement toward the cervical lymph nodes
Frequency: 2–3 times per week. This is the one part of the routine that’s genuinely hard to overdo — the scalp responds well to regular attention and most people notice a noticeable sense of release after just a few sessions.
Calli’s Tip
Pay particular attention to the area directly above and in front of the ear — this is where the temporalis is densest and where most people hold the most tension. Slow the stroke down here, and if it feels especially tight, spend an extra pass or two in this zone before moving on. The difference in how the jaw and eye area feel afterward is often noticeable within the same session.
4. Step 2 — Collarbone & SCM: Opening the Drainage Pathway First
Before anything goes up the face, we open the drain. This is a principle that comes from lymphatic work — if the exit pathway isn’t clear, you’re pushing fluid into a space with nowhere to go. The primary lymphatic drainage point for the face and neck sits just below the collarbone. Opening this area first creates the pathway that everything else in the routine will flow toward.
Switch to your ceramic gua sha tool for this step and everything that follows.
Collarbone — Inside to Outside
- Place the flat edge of the ceramic tool just below the collarbone, at the center of the chest
- Glide outward — from the center toward the shoulder — following the line of the clavicle
- The direction is always outward here, toward the lymph nodes at the outer collarbone and underarm area
- Light pressure — this area doesn’t need much. The goal is encouragement, not force
- 3–5 passes on each side
SCM (Sternocleidomastoid) — The Most Important Muscle in This Entire Routine
The SCM is the long muscle that runs diagonally along each side of the neck — from just behind the ear down to the collarbone. If you turn your head to one side and look in a mirror, you’ll see it clearly as the prominent cord of muscle on the opposite side of your neck.
This muscle is critically important and chronically neglected. When the SCM shortens — from forward head posture, screen time, tension, or stress — it pulls the head forward, compresses the cervical structures, and contributes to the rounding and shortening of the neck that most people associate with aging posture. As a chiropractor, this is one of the muscles I address most frequently. Incorporating gentle SCM work into your gua sha routine is one of the more genuinely useful things you can do for both your neck health and your facial appearance.
- Using the curved or notched edge of your ceramic tool, begin just below the ear and glide slowly downward along the length of the SCM toward the collarbone
- The direction is downward here — you are encouraging drainage toward the collarbone lymph nodes you just opened
- Work both sides — and take your time. This area often feels tender if it’s been holding tension, so ease into it
- 3–5 passes per side, slow and intentional
- Do not press hard over the front of the throat or directly over the carotid artery — work along the muscle belly, not over the central neck structures
Calli’s Tip
If your SCM feels particularly tight or tender, that’s useful information — it often means you’ve been carrying your head forward more than you realize, or that stress has been accumulating in this area. Take it as a cue to be especially gentle here, and notice whether the tension eases with consistent sessions over a few weeks. Many clients find this is the area that shows the most change with regular attention.
5. Step 3 — Jawline, Cheeks & Eyes: Working the Face
Now — and only now — we move to the face. The scalp is released, the collarbone is open, the SCM is loosened. The lymphatic pathway has somewhere to receive. This is the order that makes the face work actually work.
Jawline — Lifting from Below
The jawline is where most people want to see a difference — and where gravity and muscle tension tend to show up most visibly. The approach here is simple: we lift from below, moving upward and outward.
- Place the notched or curved edge of the ceramic tool under the chin, at the center of the jawline
- Glide outward and slightly upward along the jaw toward the earlobe — following the curve of the bone
- The direction is always from center outward and upward — never downward along the jaw
- Light to medium pressure. You should feel the tool moving along the bone, not digging into soft tissue
- 3–5 passes per side
Cheekbones — Below the Bone, Outward
- Move just below the cheekbone — place the flat edge of the tool at the center of the face, beside the nose
- Glide outward toward the temple and ear, following the lower edge of the cheekbone
- Again: center to outward, upward direction
- 3–5 passes per side
Eyes & Brow Area — The Pointed Tip
This is where the rounded point or small tip of the ceramic tool earns its place. The area between the brows — the glabella — and the inner corner of the eye socket tend to accumulate tension and fluid that’s surprisingly easy to address with gentle, targeted pressure.
- Using the rounded tip of the ceramic tool, gently press and hold into the inner corner of the brow — the small indentation where the brow meets the nose bridge. Hold for 3–5 seconds, then release. Repeat 3 times
- Move along the brow bone, pressing gently into any points that feel tight — you’ll notice the tension as a slight tenderness or resistance under the tool
- For the under-eye area: use the flat edge very lightly, gliding from the inner corner outward toward the temple. Almost no pressure here — the skin is thin and the tissue underneath is delicate
- The forehead: broad upward strokes from brow to hairline, center to temple
Many people find the eye and brow area work surprisingly relieving — the gentle pressure on the glabella in particular tends to create an almost immediate sense of eye relaxation and sinus relief.
Calli’s Tip
Finish the entire face routine by sweeping back down the neck — from jaw toward collarbone — on both sides. This closing sweep encourages any fluid that has been mobilized during the facial work to move toward the lymph nodes at the collarbone, completing the drainage loop. It takes 30 seconds and genuinely makes a difference in how long the results last.
6. The Rules That Matter Most
I want to end with the reminders I give every client who asks me about gua sha at home — because these are the things that separate a routine that helps from one that doesn’t.
- Light pressure is correct pressure. If you think you need to press harder to get results, you’re working against yourself. The lymphatic system is superficial — it responds to gentle, consistent movement, not force
- Redness is a signal, not a goal. Some mild warmth and a gentle flush is a sign of healthy circulation. Redness that lingers, or skin that feels hot or irritated after the session, means you went too hard. Back off and try lighter pressure next time
- Consistency beats intensity. Two to three times a week with light, intentional strokes will produce more cumulative benefit than an aggressive session once a month. Think of it as maintenance, not treatment
- Skip it if your skin is compromised. Active breakouts, sunburn, open irritation, recent professional treatments — all good reasons to wait. Gua sha works best on healthy, stable skin
- The goal is circulation and lymphatic flow. Not a new face shape, not instant lifting, not dramatic transformation. The real benefit builds over weeks of consistent practice — improved tone, reduced puffiness, a healthy flush, and tissue that simply feels less held and less heavy
What I Use: Tools from This Routine
Both tools I use in this exact sequence — linked for easy reference.
- 👉 Wooden Scalp Gua Sha Comb Set — Shop the scalp tool I use for temporalis release
- 👉 Ceramic Facial Gua Sha — Lymphatic Drainage — Explore the facial tool for SCM, jawline & lymphatic work
Coming Up Next on CalliGlowAlign
The Right Way to Cleanse Your Face, by Skin Type — From a Dual-Licensed Esthetician
The cleanser step is the one most people are confident they’re doing right — and the one I most consistently see working against everything else in the routine. I’m breaking down the right formula and the right technique, by skin type. No guesswork.
👉 Bookmark this page or subscribe to be notified when it goes live.
Your face will thank you for starting at the top. Literally.
— Calli
DC, LE | Licensed Chiropractor & Esthetician
As an Amazon Associate, I earn a small commission from qualifying purchases at no additional cost to you. All products featured are ones I personally use and recommend. My opinions are always entirely my own.
The information shared in this post reflects my personal experience and professional perspective as a licensed chiropractor and esthetician. It is intended for general educational and informational purposes only, and is not a substitute for personalized advice from your own healthcare provider. Every body is different — please listen to yours.
Related Articles