By Calli | Licensed Chiropractor & Esthetician | March 25, 2026
The seatbelt sign goes off at 35,000 feet, and within the hour you can already feel it — that familiar tightening in your lower back, the stiffness creeping up your neck, the subtle ache behind your shoulder blades that nobody warned you about before your 13-hour flight to Tokyo.
If you’ve read my previous post on long-haul flight wellness, you know I don’t believe in passive suffering at altitude. As someone who holds dual licenses in chiropractic care and esthetics — and who has personally had to self-adjust in an airplane bathroom after a disastrous London-to-Madrid connection — I have a lot of thoughts on this topic.
That previous post promised you a dedicated in-seat movement protocol. This is it. I’ve designed this routine specifically around the postural damage patterns I see in my clinic every week — the exact muscle groups that get destroyed by prolonged flight seating, addressed in the exact order that makes anatomical sense for both in-seat and standing work.
“Five minutes. No equipment. A measurable difference in how you feel walking off the plane — whether you’re flying economy to Europe or business class to Tokyo.”
Below, I’m breaking down every movement in this protocol, explaining exactly why each one matters clinically, and introducing the one small piece of equipment I now consider as non-negotiable as my neck pillow for long-haul flying.
IN THIS GUIDE
1. What Airplane Seating Actually Does to Your Spine
Before I walk you through the routine, I want you to understand why it’s necessary — because once you see this clearly, you’ll never skip it again.
Airplane seats are ergonomic nightmares. Standard economy seating forces your lumbar spine into a prolonged C-curve flexion position — the opposite of your spine’s natural lordotic curve — while simultaneously pushing your head slightly forward of your center of gravity. That forward head posture alone creates a lever-arm force on your cervical spine of up to 60 lbs (the weight of your 10–12 lb skull multiplied by the mechanical disadvantage of forward displacement). Hold that for 10–13 hours and you’ve systematically damaged four interconnected systems:
- Cervical facet joint compression — the small joints in your neck that govern rotation and lateral bending
- Increased lumbar disc pressure — particularly at L4/L5, the most common site of disc herniation I treat clinically
- Deep muscle guarding — your trapezius, rhomboids, and paraspinal muscles lock into involuntary protective tension
- Venous stasis in the lower extremities — reduced blood return from the legs dramatically increases DVT risk on flights over 4 hours
The solution is not passive rest. Sitting still and hoping for the best is literally what causes the problem. The key to a pain-free flight is proactive movement — and this protocol gives you exactly that.
Calli’s Tip
Set a timer on your phone for every 90 minutes once the seatbelt sign goes off. When it fires, do Part 1 of this routine in your seat (3 minutes), then walk to the galley for Part 2 (2 minutes). That’s 5 minutes per cycle — less time than a bathroom line — and it will completely change how you feel on arrival.
2. The 5-Minute In-Seat Reset Routine
This is Part 1 — everything you can do without leaving your seat. I’ve sequenced these movements deliberately, starting at the cervical spine and working downward, finishing with lower-body circulation work. Don’t randomize the order. The cervical release first allows your upper traps to relax before you mobilize the thoracic region, which significantly improves the effectiveness of each subsequent movement.
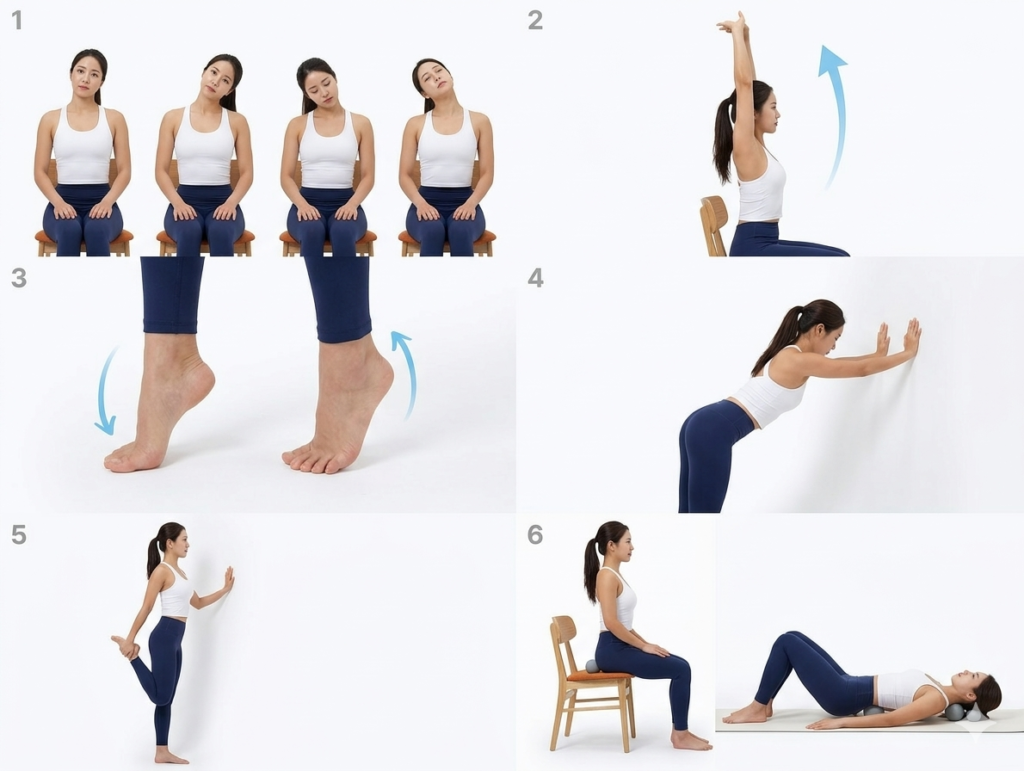
Movement 1: Neck & Shoulder Release — The Tension Killer
Sit up straight and detach your back entirely from the seat back — active sitting posture, not passive slouch. Perform large, slow neck circles: five full rotations in each direction, moving through your full available range. Don’t rush this. The goal is to glide the cervical facet joints through their full range before they’ve been compressed for another 90 minutes.
Follow immediately with large shoulder rolls — ten repetitions moving from front-to-back, then back-to-front. Focus on feeling the movement originate from between your shoulder blades, not just from your shoulders themselves. This activates the lower trapezius and rhomboids, which are chronically underused in prolonged sitting and chronically overloaded when they finally have to do any work.
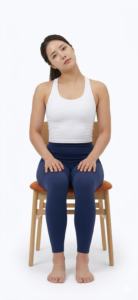
Movement 2: Reach & Stretch — The Side Body Opener
Interlace your fingers and turn your palms toward the ceiling. Press your palms upward as high as you can while keeping your elbows relatively straight — you’re creating axial decompression through your lumbar and thoracic spine, the exact opposite of what the seat has been doing to it. Hold for 10 seconds, breathing deeply into your ribcage.
From that extended position, slowly lean your torso to the left and hold for 5 seconds, then to the right and hold for 5 seconds. You’re targeting the quadratus lumborum and the lateral thoracic musculature — the muscles that run along the outside of your rib cage and lower back. These are notorious for cramping during long flights and almost never addressed in standard “in-seat exercise” advice you’ll find on airline safety cards.
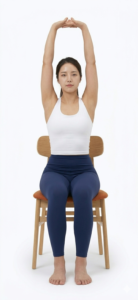
Movement 3: Ankle Pumps & Calf Activation — DVT Prevention
This is the most clinically critical movement in the entire routine, and it’s the one most people skip because it feels too simple. Lift your feet slightly off the floor and perform large ankle circles — ten rotations in each direction. Then plant your feet flat and perform rapid ankle pumps: lift your toes while keeping your heels down, then lift your heels while keeping your toes down. Thirty repetitions at a pace of roughly one per second.
This activates the soleus muscle — the deep calf muscle that functions as a secondary heart for venous return from the lower extremities. When you’re seated for hours with your knees at 90 degrees, venous flow from your calves essentially stalls. This movement restores it. If the passenger next to you allows space, follow this with gentle bilateral calf massage using your own hands — pressing from ankle toward knee in long upward strokes. This is the most effective DVT prevention strategy you can perform without medication.
Calli’s Tip
If you have a documented history of DVT, clotting disorders, or varicose veins, speak with your physician before flying long-haul and ask about compression stockings. This routine is designed for healthy travelers as a preventive protocol — it is not a substitute for medical-grade DVT management in high-risk patients.
3. The Standing Full-Body Decompression Break
Part 2 requires you to actually stand up and walk to the galley or a bulkhead wall. I know this feels like an imposition on a packed flight. Do it anyway. The two minutes you spend here will do more for your spinal health than any amount of in-seat movement — because it allows full gravitational decompression of the lumbar discs, something you simply cannot achieve while seated.
Movement 4: The Wall Lean — Total Spinal Unwinding
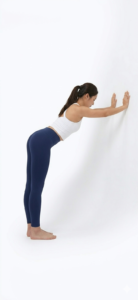
Find a secure bulkhead wall. Place both hands on the wall at shoulder width and step your feet back until your body forms a roughly 45-degree angle. From this position, exhale slowly and allow your chest to drop toward the floor — you’re going into a standing version of the yoga “puppy pose” position, allowing your thoracic spine and shoulder girdle to decompress passively under the weight of your own torso. Keep your legs straight or slightly bent depending on your hamstring flexibility.
Hold for 15 seconds. The key is to relax completely into the stretch rather than actively pulling. Your head should be between your arms, hanging freely. This position simultaneously decompresses the thoracic spine, lengthens the thoracolumbar fascia, and provides passive traction to the posterior cervical muscles — the exact tissues most loaded by forward head posture during the preceding 90 minutes of seated flight.
Movement 5: Hip Flexor & Quad Stretch — Never Skip This
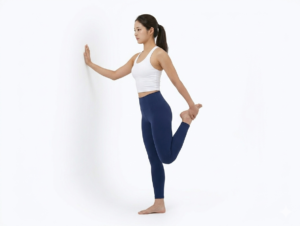
For balance, place one hand on the bulkhead wall. Bend one knee and bring your heel toward your glute, reaching back to hold your ankle with the corresponding hand. From there — and this is the critical part most people miss — gently push your hip forward while keeping your torso upright. You should feel a deep, significant stretch in the anterior hip and thigh that is distinctly different from simply pulling your heel up.
Hold each side for 10 seconds. The reason this movement is essential: prolonged hip flexion in aircraft seating creates chronic adaptive shortening of the iliopsoas — the deep hip flexor that connects your lumbar vertebrae to your femur. When you finally walk off the plane with tight hip flexors, your lumbar spine is pulled into anterior tilt with every step, compressing the posterior disc space and generating the low back ache that can persist for days. Ten seconds per side, done every 90 minutes, prevents this entirely.
Calli’s Tip
While you’re standing at the galley, add 20 calf raises before returning to your seat. Stand with feet hip-width apart, rise onto your toes, lower slowly. This is the most space-efficient circulation boost you can do standing — activating the same soleus pumping mechanism as the seated ankle pumps, but with your full body weight providing additional venous return stimulus.
4. The Secret Weapon: Massage Balls for In-Flight Sciatica Relief
Now we get to the piece of equipment I didn’t include in my original flight wellness post — because it deserved its own section. I’ve been recommending this tool to frequent-flyer patients for years, and the feedback is consistently that it produces more immediate symptomatic relief than anything else they’ve tried at altitude.
Those bulky massage gadgets and percussive devices you see advertised for travel are generally impractical — too large, too conspicuous, and frankly too aggressive for the type of sustained-pressure release that benefits long-haul flyers. What actually works is far simpler.
Why the Gluteal Muscles Are the True Culprit
Here is something I tell every patient who comes in complaining of “back pain after flying”: in the majority of cases, the primary driver is not actually the lumbar spine. It’s the gluteal complex — specifically the piriformis muscle, a small but powerful external hip rotator that sits deep beneath the gluteus maximus and runs directly over the sciatic nerve.
In prolonged seated posture, the piriformis and surrounding gluteal musculature are under sustained compressive load. In susceptible individuals — especially those with a history of sciatica or L4/L5 disc issues — this compression can trigger sciatic nerve irritation that radiates from the buttock down the leg. This is piriformis syndrome, and it is extraordinarily common in long-haul travelers. It also responds beautifully to targeted sustained-pressure release — which is exactly what the massage balls provide.
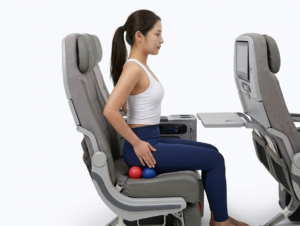
In-Seat Application: Piriformis Release
Place one massage ball under each gluteal muscle, positioned at the area of the ischial tuberosity — what you’d colloquially call the sitting bone. You’ll know you’re in approximately the right position when you feel a significant pressure sensation that is tender but not sharp.
Slowly shift your body weight, rolling slightly in small circles to explore the area. You’re looking for “trigger points” — focal areas of particularly intense pressure sensitivity that often refer sensation down the leg. When you find one, hold still on that point with steady pressure for 30–60 seconds. You’ll typically feel the intensity gradually decrease as the tissue releases. This is the therapeutic window. Move to the next point.
Post-Flight Recovery: Thoracic Spine Mobilization
Once you’re off the plane and have access to a floor (hotel room, airport lounge), the massage balls serve a completely different function. Lie on your back and place both balls on either side of your thoracic spine — they should sit in the paraspinal gutter, the groove between your spinous processes and the erector muscles. Start at about T6 (mid-back) and work upward.
Allow your body weight to sink into the balls and gently extend your thoracic spine over them. You can support your head with your hands. This creates a gentle posterior-to-anterior mobilization force on the thoracic facet joints — mimicking what I would do manually in a chiropractic adjustment session. The difference in thoracic mobility after 3–4 minutes of this is substantial. I do this every single time I land after a flight over 6 hours.
Calli’s Tip
When using massage balls — either in-seat or post-flight — maintain slow, deep diaphragmatic breathing throughout. This is not optional. Diaphragmatic breathing activates the parasympathetic nervous system, which directly reduces muscle guarding and allows the deep tissue to release far more effectively than if you’re holding your breath or breathing shallowly. If a point is too intense to breathe through, lighten your pressure until you can.
5. Final Thoughts: Movement Is the Medicine
If I could summarize everything I know about in-flight spinal health in a single principle, it would be this: your body was not designed for prolonged static posture, and no seat upgrade changes that fundamental fact. The only real solution is consistent, intelligent movement — and now you have the exact protocol I use myself and prescribe clinically.
You don’t need a yoga mat in the aisle. You don’t need a foam roller in your carry-on. You need five minutes per 90-minute window, a pair of massage balls that fit in the palm of your hand, and the understanding of why each movement matters. That combination will land you in Barcelona, Tokyo, or Seville feeling like yourself — not like someone who just folded into a metal tube for 13 hours.
Calli’s Complete In-Flight Movement Checklist
- Every 90 minutes — In-Seat: Neck circles + shoulder rolls → Overhead reach + side bend → Ankle pumps + calf massage
- Every 90 minutes — Standing: Wall lean spinal decompression (15 sec) → Hip flexor stretch each side (10 sec) → 20 calf raises
- As needed in-flight: 👉 Massage Ball Set — piriformis release, 30–60 sec per trigger point
- Post-flight: 👉 Massage Ball Set — thoracic spine mobilization on the floor, 3–4 minutes
- Don’t forget from the previous post: 👉 Ergonomic Travel Neck Pillow + 👉 Magnesium Glycinate
Coming Up Next on CalliGlowAlign
How to Reset Your Circadian Rhythm After a Long-Haul Flight: A Chiropractor’s Jet Lag Protocol
You landed. You stretched. Now your body has no idea what time it is. In my next post I’m covering the exact light exposure, melatonin timing, and movement protocol I use to reset my circadian rhythm within 24 hours — clinically grounded and actually tested across 12 time zones.
👉 Bookmark this page or subscribe to be notified when it goes live.
Your body carried you across an ocean. The least you can do is give it five minutes every hour and a half. Take care of it — it’s the only carry-on you can never replace.
— Calli
DC, LE | Licensed Chiropractor & Esthetician
As an Amazon Associate, I earn a small commission from qualifying purchases at no additional cost to you. All products featured are ones I personally use and clinically recommend. My opinions are always entirely my own.