By Calli | Licensed Chiropractor & Esthetician | April 6, 2026
Last month I was standing at Gate 47B at LAX — red-eye to Tokyo, carry-on only — and the woman next to me was literally sitting on her suitcase trying to zip it shut. She looked up at me, out of breath, and said, “I swear I only packed the essentials.” I smiled because that used to be me.
I fly at least twice a month between my chiropractic clinic days in Santa Monica and esthetician conferences, product sourcing trips, and the occasional personal getaway. For years, I was the person who checked a massive bag, stuffed a second “personal item” that was really a full-sized duffel, and still somehow forgot my toothbrush. My back ached from lugging overweight luggage through terminals — ironic for a chiropractor, I know. It took one catastrophic lost-luggage incident in Lisbon (four days, zero clothes, one very expensive hotel gift shop) for me to completely overhaul how I pack. Now I travel carry-on only about 90% of the time, my bag is organized down to the cable, and I breeze through TSA like it is my personal fast lane. These are the exact hacks I use every single trip.
“Calli literally repacked my bag in the clinic lobby before my honeymoon trip. I went from two checked bags to one carry-on and a personal item. I still can’t believe everything fit.”
IN THIS GUIDE
1. Why Compression Packing Cubes Changed Everything
Before packing cubes, my suitcase was a chaos pit. I would roll some items, fold others, and inevitably end up digging through everything at the hotel to find one pair of socks. The moment I switched to roll-up compression packing cubes, I gained back roughly 40% of my suitcase volume — and I am not exaggerating. The compression zipper literally squeezes the air out of your clothing stack so that a week’s worth of outfits condenses into a slim, organized brick.
How I Use Them (My Exact System)
I use a set of four cubes and assign each one a category. This way I never unpack into hotel drawers — I just pull the cube I need and zip it back up.
- Cube 1 — Tops and Blouses: I fold each top in thirds, stack them flat, then compress. Even silk blouses come out wrinkle-free because the compression holds them in place and prevents shifting during transit.
- Cube 2 — Bottoms and Dresses: Jeans get rolled tightly from the hem up; dresses get folded once lengthwise then rolled. Rolling inside a compression cube prevents the creasing you get from a traditional fold.
- Cube 3 — Undergarments, Socks, and Sleepwear: I nest socks inside bra cups to save space and maintain bra shape. Underwear gets stacked flat underneath. Sleepwear rolls around the outside edges.
- Cube 4 — Workout or Specialty Clothes: Gym leggings, swimsuits, or cold-weather layers depending on the trip. Having a dedicated cube means I am never digging through my nice clothes with sandy beach hands.
Why Compression Beats Regular Cubes
Regular packing cubes organize but do not save space. They are just fabric boxes. Compression cubes have a second zipper that cinches the cube down, physically compressing your clothes. For a carry-on-only traveler, this is the difference between fitting five days of clothes and fitting eight. I have tested this on over thirty trips now, and I will never go back to loose packing or regular cubes.
💙 Calli’s Pick · Luggage Organization
Roll-Up Compression Packing Cubes
Double-zipper compression · Lightweight ripstop fabric · Multiple size set
These are the exact cubes in my carry-on right now. They cut my packing volume almost in half.
Calli’s Tip
Pack your cables and chargers inside a hard eyeglass case. It keeps them organized, protects them from getting bent or tangled with everything else, and you can find them instantly when you need to charge at the gate. I keep one case for charging cables and one for earbuds and adapters. It sounds small, but it eliminates that frantic dig through every pocket at 30,000 feet.
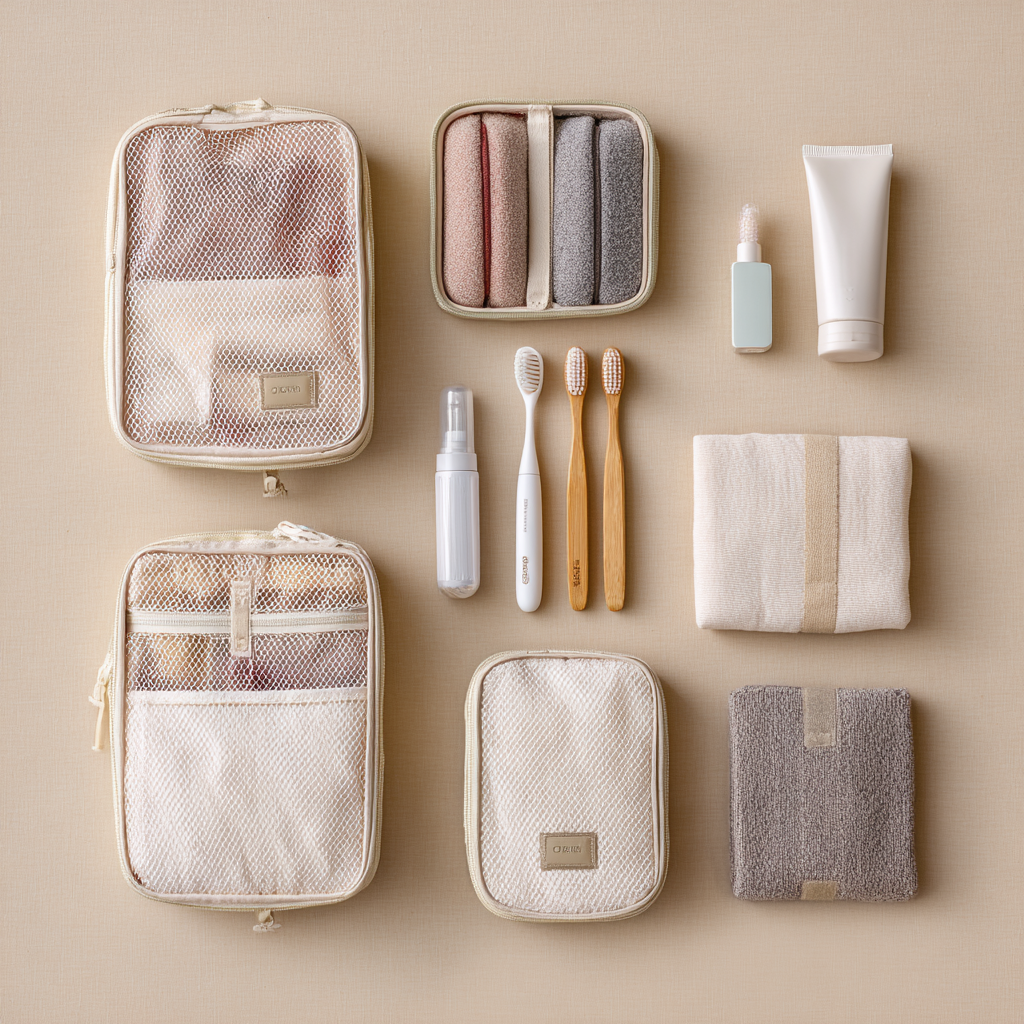
2. Toiletry and Skincare Organization That Survives TSA
As an esthetician, I refuse to compromise my skincare routine just because I am at 35,000 feet. But I also refuse to check a bag solely because of liquids. The solution is a combination of smart containers, solid-format products, and a toiletry bag that actually works — not those sad little zippered pouches that collapse the moment you hang them on a hotel towel rack.
The Hanging Mesh Toiletry Bag Advantage
I switched to a see-through mesh hanging bag about two years ago and it has been a revelation. The mesh means I can see every product without unzipping multiple compartments. The hook means it hangs on any bathroom door, towel rack, or shower hook — no more spreading my products across a tiny hotel counter. And because it is mesh, if anything leaks (it has happened exactly once, thanks to cabin pressure), it does not pool inside a sealed pocket and ruin everything. The liquid drains, you spot it immediately, and you deal with it.
- TSA Checkpoint Speed: Because the bag is see-through, I pull it out of my carry-on and lay it flat in the bin. TSA agents can visually verify the contents without asking me to open it. I have sailed through security in under two minutes at LAX PreCheck multiple times with this setup.
- Compartment Logic: I keep skincare (cleanser, serum, SPF) in the top section, makeup in the middle, and dental/misc in the bottom. Same layout every trip — muscle memory means I never forget where something is, even in a dark hotel room at 2 AM.
- Durability for Frequent Use: Cheap toiletry bags fall apart after a few trips. A quality mesh bag with reinforced zippers can handle being stuffed in a carry-on fifty-plus times a year. Mine still looks brand new after two years of bimonthly travel.
💙 Calli’s Pick · Toiletry Organization
Travel Mesh Toiletry/Makeup Hanging Bag
See-through mesh compartments · Sturdy hanging hook · Multiple zippered sections
I have tried at least a dozen toiletry bags. This is the only one I have repurchased — and then bought three more as gifts.
Calli’s Tip
Use empty contact lens cases to store liquid samples and mini cosmetics. Each side has a screw-top lid that is completely leak-proof, and the whole thing is smaller than a quarter. I fill one side with my favorite serum and the other with eye cream — that is two products in something that weighs almost nothing and easily clears TSA. For a weekend trip, two or three contact lens cases replace an entire row of mini bottles.
3. Travel Oral Care: Solid Toothpaste and Disposable Kits
This section might seem oddly specific, but hear me out — oral care is one of the most underrated packing problems. Traditional toothpaste tubes count toward your TSA liquid limit. They explode in checked bags thanks to cabin pressure changes. And if you have ever been on a 14-hour flight and wanted to brush your teeth mid-journey, you know how annoying it is to dig through your overhead bag for a full-sized toothbrush and paste.
Why Solid Toothpaste Is a Game Changer
Solid toothpaste comes in small tablet or stick form — no liquid, no gel, no TSA issue. You simply bite a tablet, add water with your toothbrush, and brush normally. It foams exactly like regular toothpaste, freshens your breath, and takes up less space than a tube of chapstick. I keep a tin of solid toothpaste in my personal item so I can freshen up during layovers or long flights without accessing the overhead bin at all.
The Disposable Toothbrush-Toothpaste Combo
For even faster freshening, I carry a few disposable toothbrush-toothpaste combo units. These are single-use mini toothbrushes with paste already built into the bristles. You do not need water — just brush, rinse if you want, and toss it. I keep two in my jacket pocket during travel days. One for the outbound flight, one for the return. They are also perfect for that gross mouth feeling after airplane coffee.
- No Liquid Limit Impact: Solid toothpaste tablets are classified as a solid, not a liquid or gel. They do not count toward your one-quart bag. This frees up space for serums, moisturizers, or other liquids you actually need.
- Freshness at 30,000 Feet: Airplane air is notoriously dry — around 10-20% humidity, which is drier than most deserts. This dries out your mouth, feeds bacteria, and makes breath significantly worse. Having an easy brushing option mid-flight is not vanity; it is genuine hygiene.
- Hotel Backup: Hotel toothbrushes are often terrible quality with splayed bristles that do more harm than good. Having your own disposable set means you are never relying on whatever the front desk has behind the counter at midnight.
💙 Calli’s Pick · Travel Oral Care
Solid Toothpaste + Disposable Toothbrush-Toothpaste Combo Set
TSA-friendly solid format · No water needed for disposable set · Compact and lightweight
I never board a flight without these. The mid-flight fresh mouth feeling alone is worth it.
Calli’s Tip
Keep a solid toothpaste tab and one disposable toothbrush in your jacket pocket — not in your bag. When you are stuck in a middle seat on a six-hour flight and the seatbelt sign is off for exactly four minutes, you want to be able to grab it and go to the lavatory without overhead bin gymnastics. That quick brush after airplane coffee honestly changes the entire second half of the flight.
4. The Tiny Hacks That Solve Big Packing Problems
Some of my favorite packing tricks do not involve buying anything new at all. They use items you already own in ways you probably never considered. These are the hacks I share with patients when they mention upcoming trips, and every single one gets the same reaction: “Wait, why didn’t I think of that?”
The Straw Necklace Trick
If you travel with necklaces or delicate chains, you know the horror of opening your bag to find a tangled knot that takes twenty minutes and a pair of tweezers to undo. Here is the fix: take a regular drinking straw, cut it in half (or to the length of your chain), unclasp the necklace, thread one end through the straw, and re-clasp it on the other side. The rigid straw prevents the chain from bending, looping, or tangling with anything else. I have traveled with four necklaces in one small pouch using this method and every single one came out perfectly straight. It is genuinely a game changer for anyone who refuses to leave their jewelry at home.
The Contact Lens Case Trick (Revisited)
I mentioned this above for skincare, but the applications go even further. I have used contact lens cases to carry foundation samples, concealer, lip balm, and even a tiny amount of hair serum. Each case holds two different products. For a three-day trip, three contact lens cases replace six mini bottles and weigh practically nothing. The screw-top design means they truly do not leak — I have tested them in checked luggage, carry-ons, and even a backpack that got rained on in Seoul. Not a single spill.
The Eyeglass Case Cable Organizer
I keep a hard-shell eyeglass case specifically for cables. One case holds my phone charging cable, my laptop USB-C cable, and a wall adapter. The hard shell protects the cable ends from bending (which is how cables die prematurely), and the case fits neatly into any bag pocket. No more tangled cables knotted around your headphones at the bottom of your bag. I picked up this trick from a videographer I sat next to on a flight from LAX to JFK, and it has been a permanent part of my packing system ever since.
- Shower Cap Over Shoes: Place a hotel shower cap over the soles of your shoes before packing them. It keeps dirt off your clean clothes while still allowing ventilation so shoes do not develop odor in a sealed bag.
- Dryer Sheet Between Layers: Tuck a single dryer sheet between your packing cubes. It keeps everything smelling fresh, even if your gym clothes are sealed in the next cube over. I use unscented ones to avoid irritating sensitive skin.
- Rubber Band on Rolled Clothes: If you do not use compression cubes, wrap a rubber band around each rolled item. It prevents the roll from unraveling and saves you from re-rolling everything after TSA opens your bag.
Calli’s Tip
To prevent necklaces and chains from tangling in your bag, cut a drinking straw in half, thread the necklace chain through the straw, then clasp it closed. The straw holds the chain straight and rigid so it physically cannot knot up. I pack four or five necklaces this way in a single small pouch and they always come out perfect. This trick alone has saved me more frustration than almost any product I own.
5. How a Chiropractor Packs to Protect Her Spine
I treat patients every week who come in with back and neck pain that started — or dramatically worsened — after a trip. And when I ask how they packed, the answer is almost always the same: one giant heavy bag, no organization, constant bending and twisting to find things. As a chiropractor, I think about packing through the lens of spinal health, and the truth is that how you organize your bag directly impacts how much strain you put on your body during travel.
Weight Distribution Matters More Than Weight
A 22-pound carry-on is manageable if the weight is distributed evenly. The same 22 pounds with everything shifted to one side will torque your shoulder and compress your lumbar spine every time you lift it into the overhead bin. Packing cubes solve this automatically because they create uniform, dense blocks that stack symmetrically. I place heavier cubes (jeans, shoes) at the bottom of my bag near the wheels, and lighter cubes (tops, undergarments) on top. This keeps the center of gravity low and makes the bag easier to control.
The Overhead Bin Lift
I see so many people twist their torso while lifting a bag overhead — that is a textbook mechanism for a lumbar disc injury. The correct technique is to face the bin squarely, engage your core, and press the bag straight up using both arms equally. If your bag is well-organized with even weight distribution, this lift is smooth and controlled. If your bag is a chaotic mess with a heavy toiletry kit on one side, you are going to compensate with a twist, and that is when injuries happen.
- Personal Item Placement: Your personal item should hold anything you need during the flight — headphones, snacks, solid toothpaste, phone charger — so you never have to get up and reach overhead during turbulence. This reduces the number of times you compress and twist your spine in a cramped aisle.
- Backpack vs. Tote: If your personal item is a backpack, wear both straps. A tote or crossbody that hangs on one shoulder creates asymmetric spinal loading. Over a full day of travel, that uneven load can trigger muscle spasms in your trapezius and levator scapulae — the muscles between your neck and shoulder blade.
- Hotel Unpacking: Place your suitcase on the luggage rack or bed to unpack — never on the floor. Bending over a suitcase on the ground for ten minutes in a flexed spinal position after hours of sitting on a plane is one of the most common triggers for acute low back pain I see in my practice the week after holiday travel seasons.
Calli’s Tip
Place your heaviest packing cube at the bottom of your bag near the wheels, and your lightest at the top. This keeps the center of gravity low, which makes your carry-on significantly easier to control when you are speed-walking through a connecting terminal or lifting it into the overhead bin. Your lower back will thank you — trust me, I adjust enough post-travel spines to know.
Calli’s Travel Packing Essentials Checklist
- 👉 Roll-Up Compression Packing Cubes — Cut your suitcase volume nearly in half and keep every category organized
- 👉 Travel Mesh Toiletry/Makeup Hanging Bag — See-through, hangable, and TSA-checkpoint fast
- 👉 Solid Toothpaste + Disposable Toothbrush-Toothpaste Combo Set — No liquids, no mess, fresh mouth at 30,000 feet
Coming Up Next on CalliGlowAlign
International Travel Checklist: Never Leave Without Checking These 7 Things
From passport expiration traps to the one vaccination document most people forget — I am breaking down the seven non-negotiable things to verify before any international trip. One missed item can ruin the whole journey.
👉 Bookmark this page or subscribe to be notified when it goes live.
Packing is one of those things that feels mundane until you get it right — and then it feels like a superpower. Every trip I take now starts with a calm, organized bag and ends with everything still in its place. No frantic repacking. No lost items. No back pain from a lopsided suitcase. These hacks are small, but stacked together they completely transform the travel experience. Start with one — the compression cubes, the straw trick, whatever resonates — and build from there. Your future self, standing relaxed at the gate with a perfectly packed carry-on, will be grateful.
— Calli
DC, LE | Licensed Chiropractor & Esthetician | Helping you glow, align, and travel smarter.
As an Amazon Associate, I earn a small commission from qualifying purchases at no additional cost to you. All products featured are ones I personally use and clinically recommend. My opinions are always entirely my own.
Related Articles